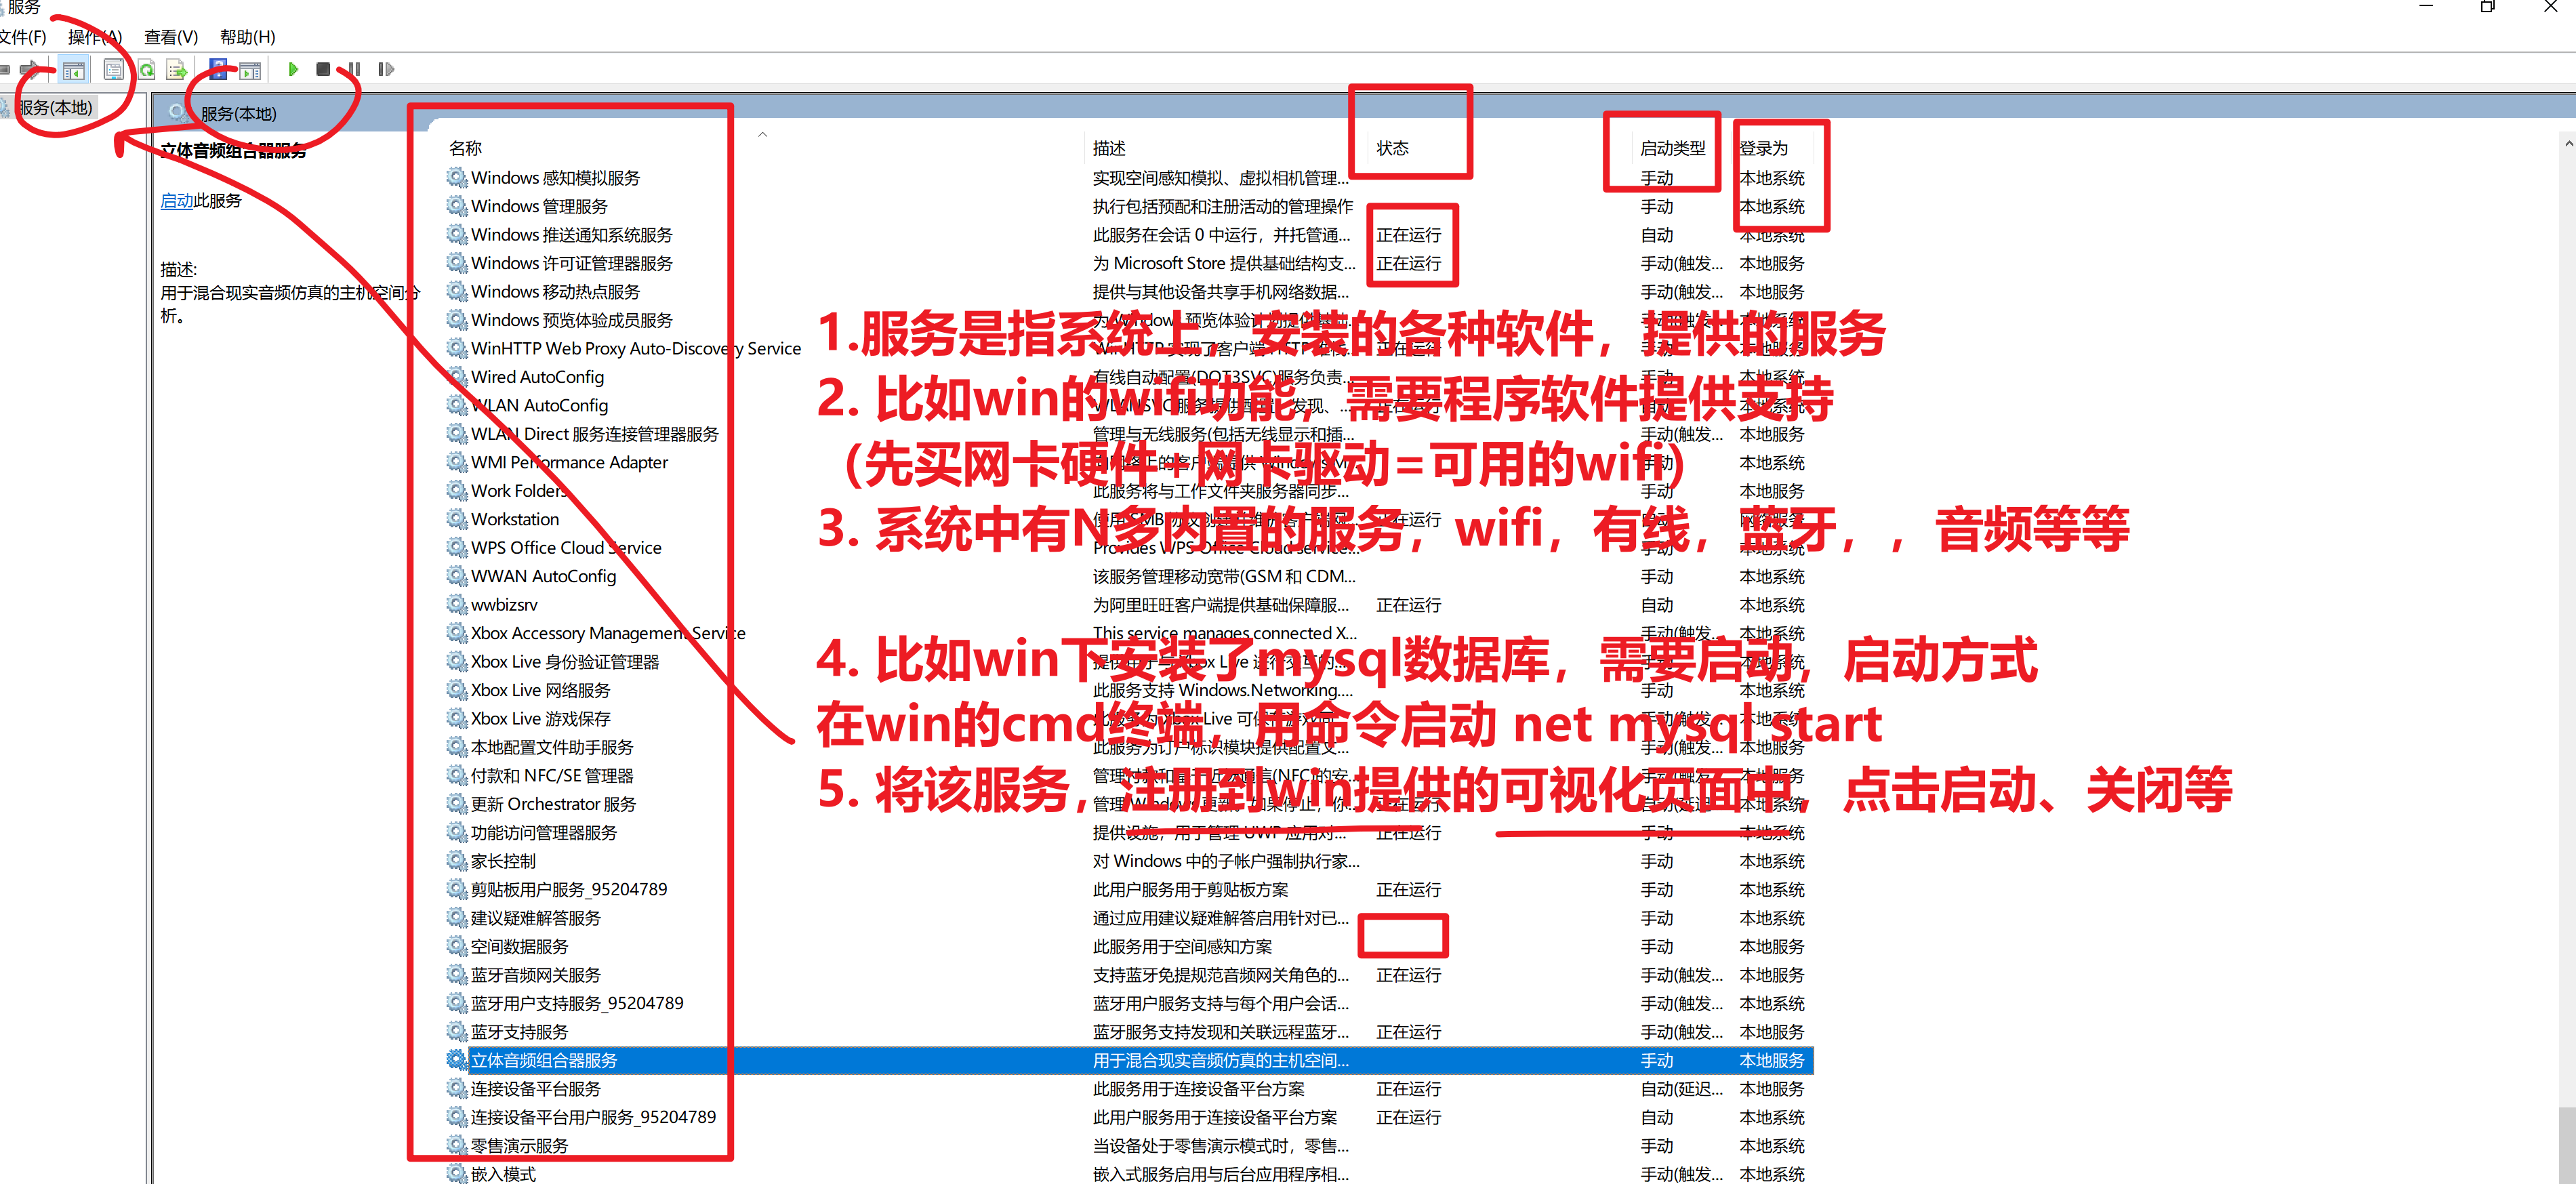
今日服务管理学习
先以windows的服务为例,如何找到win的服务管理
win键 + r快捷键,打开运行窗口,输入如下指令

services.msc
linux默认提供的服务
ssh服务
1.ssh服务
[root@yuanlai-0224 opt]# netstat -tnlp |grep sshd
tcp        0      0 0.0.0.0:22              0.0.0.0:*               LISTEN      1129/sshd
tcp        0      0 127.0.0.1:6010          0.0.0.0:*               LISTEN      125786/sshd: root@p
tcp6       0      0 :::22                   :::*                    LISTEN      1129/sshd
tcp6       0      0 ::1:6010                :::*                    LISTEN      125786/sshd: root@p

2. 我可以自由启动,关闭,重启该服务,查看效果

3. 学习centos7,启动的强大,服务管理命令

systemctl  start/stop/restart/status   服务名称

systemctl stop sshd

systemctl status sshd

systemctl start sshd 启动

4.sshd服务,运行后,即可去访问该服务
network服务
管理linux的网络功能,名字叫network
对network服务管理,启停,查看

systemctl stop network 停止

systemctl status network 查看状态

systemctl start network   启动

systemctl restart   重启
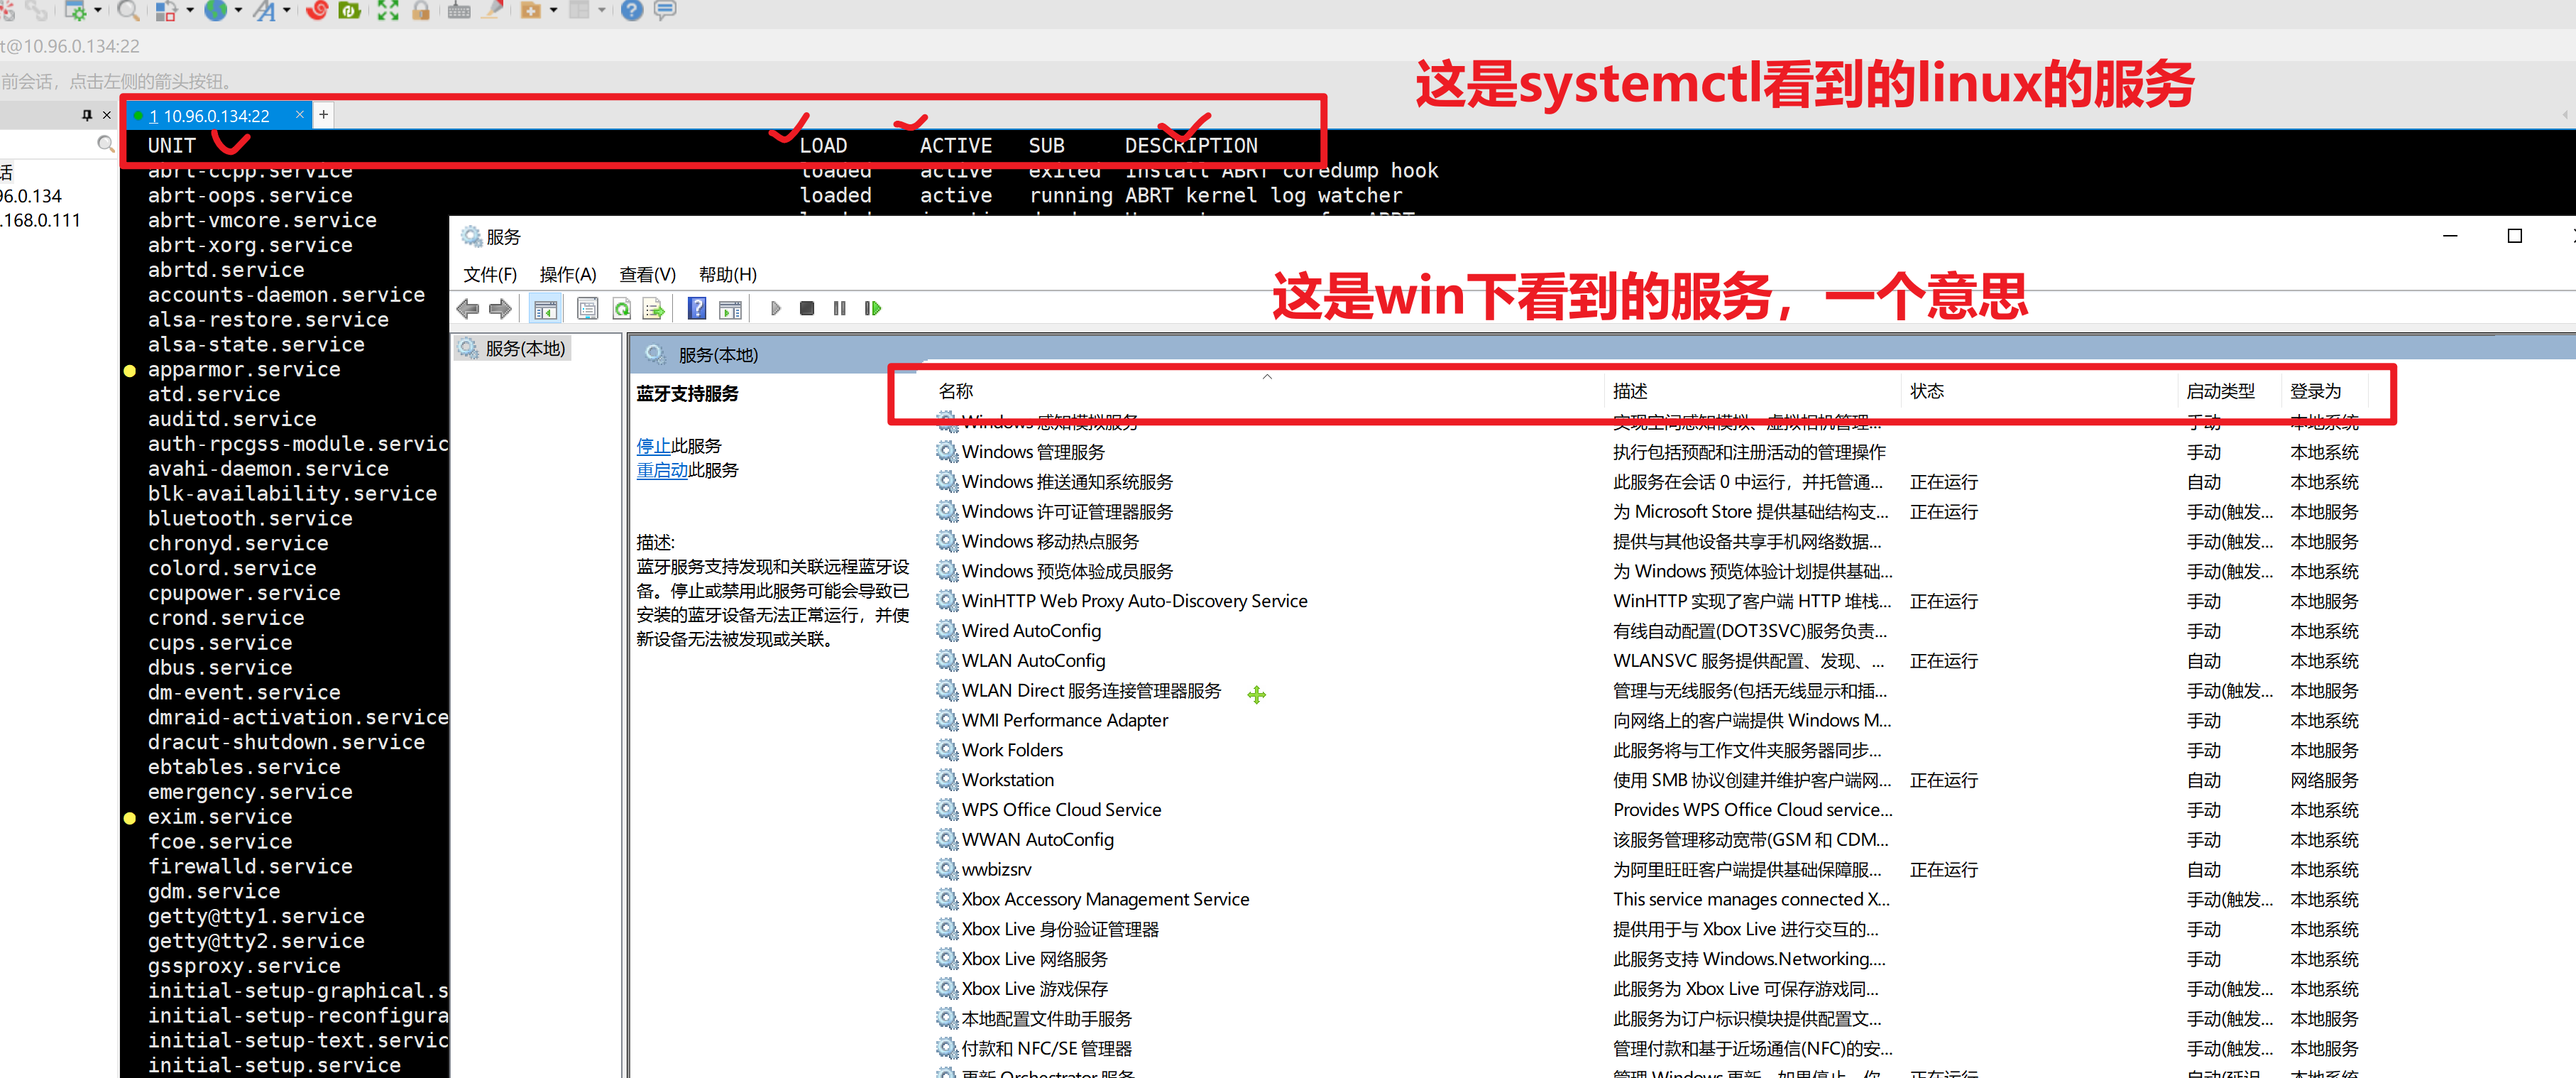
systemctl服务管理命令
在centos6时代,是service管理服务的运行状态
service命令用于对系统服务进行管理,比如启动(start)、停止(stop)、重启(restart)、重新加载配置(reload)、查看状态(status)等。

# service mysqld  指令      #打印指定服务mysqld的命令行使用帮助。

# service mysqld start    #启动mysqld

# service mysqld stop    #停止mysqld

# service mysqld restart    #重启mysqld (先停止,再运行 ,进程会断开,id会变化)

# service mysqld reload    # 当你修改了mysqld程序的配置文件,需要重新加载该配置文件,而不重启
chkconfig: 指定服务是否开机启动
sshd 远程连接服务
network 提供网络的服务

设置开机自启


提供了一个维护/etc/rc[0~6] d 文件夹的命令行工具,它减轻了系统直接管理这些文件夹中的符号连接的负担。chkconfig主要包括5个原始功能:为系统管理增加新的服务、为系统管理移除服务、列出单签服务的启动信息、改变服务的启动信息和检查特殊服务的启动状态。当单独运行chkconfig命令而不加任何参数时,他将显示服务的使用信息。

[root@localhost www]# chkconfig --list    #查看系统程序列表

[root@localhost www]# chkconfig httpd on  #将httpd加入开机启动

[root@localhost www]# chkconfig httpd off  #关闭httpd开机启动
备注
在centos7中,service启停服务的命令和 chkconfig命令,都被统一整合为了systemctl
并且你依然可以使用旧的命令,系统会自动的转变为systemctl去执行。
做了向下兼容的操作,新命令,兼容旧命令。
systemctl语法
systemctl(英文全拼:system control)用于控制 systemd 系统和管理服务。

语法

systemctl [OPTIONS...] COMMAND [UNIT...]

command 选项字如下:

unit(单元,服务,指的是如sshd,network,nginx,这样的服务名(unit))

这几个指令,就替代了旧版的service 服务名 start/stop/等等
start:启动指定的 unit。
stop:关闭指定的 unit。
restart:重启指定 unit。
reload:重载指定 unit。
status:查看指定 unit 当前运行状态。
is-enabled :查看是否设置了开机自启


替代了旧版的chkconfig 服务名 on/off

enable:系统开机时自动启动指定 unit,前提是配置文件中有相关配置。  设置开机自启
disable:开机时不自动运行指定 unit。  禁用开机自


参数:unit 是要配置的服务名称。
具体用法,比如sshd服务,你也可以更换为其他的内置服务名,即可管理.
- 启动sshd,systemctl start sshd
- 关闭,systemctl stop sshd
- 重启,systemctl restart sshd
- 重新加载 systemctl reload sshd
- 开机自启 ,systemctl enable sshd
- 禁止开机自启,systemctl disbale sshd
- 查看,sshd服务,是否开机自启,systemctl is-enabled sshd.service
列出系统中,所有的内置服务,名字,和状态
systemctl list-units --type service --all
运行中
挂掉的
全列出来
以查看sshd的服务为例
  sshd.service                                          loaded    active   running OpenSSH server daemon

当你执行了systemctl start sshd # 也就是在操作上述的服务了,该sshd是来自于openssh软件包的一个进程
只列出,active运行中的服务
systemctl list-units --type service
可以利用该命令,搜索出,系统内置服务名的完整名称,才可以去管理
[root@yuanlai-0224 ~]# systemctl list-units --type service --all |grep ssh
  sshd-keygen.service                                   loaded    inactive dead    OpenSSH Server Key Generation
  sshd.service                                          loaded    active   running OpenSSH server daemon


[root@yuanlai-0224 ~]# systemctl is-enabled sshd.service
enabled
修改网络模式,修改静态ip,动态ip获取方式
system control 系统控制,systemctl
查看当前的上网信息
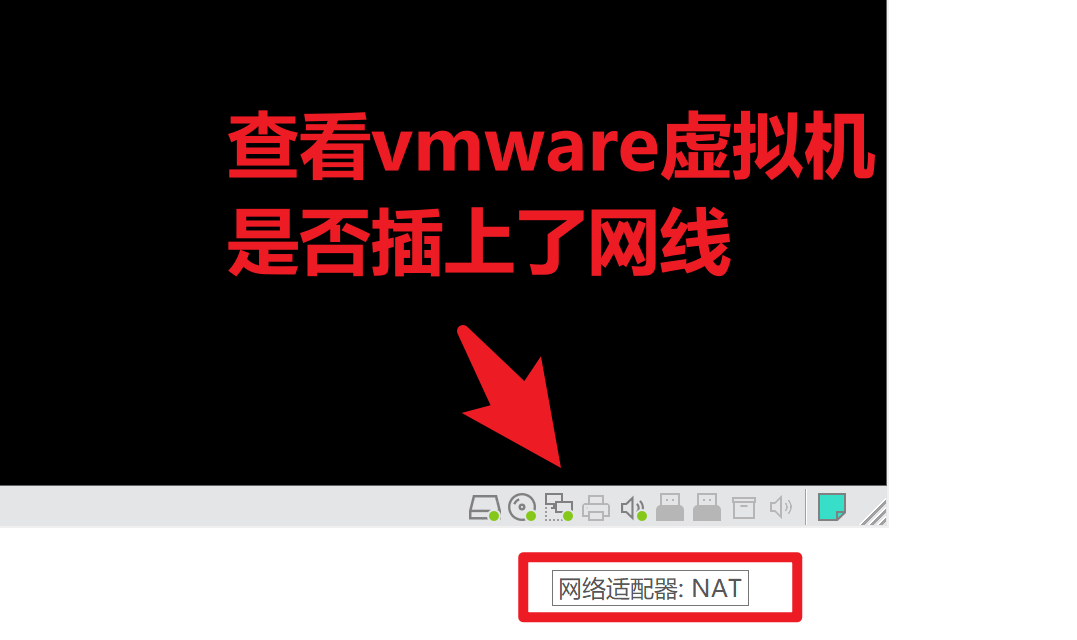
1.确保你的机器,是连接的网络的,是插上了网线的。(模拟了物理服务器的软件是什么?看你的虚拟的机器(vmware))
2.进入系统,查看软件的网络配置了
进入网卡配置文件目录
[root@yuanlai-0224 ~]# cd /etc/sysconfig/network-scripts/
[root@yuanlai-0224 network-scripts]#
[root@yuanlai-0224 network-scripts]#
[root@yuanlai-0224 network-scripts]# ll
总用量 248
-rw-r--r--. 1 root root   310 2月  25 15:12 ifcfg-ens33
-rw-r--r--. 1 root root   254 1月   3 2018 ifcfg-lo
lrwxrwxrwx. 1 root root    24 2月  25 15:05 ifdown -> ../../../usr/sbin/ifdown
-rwxr-xr-x. 1 root root   654 1月   3 2018 ifdown-bnep
-rwxr-xr-x. 1 root root  6569 1月   3 2018 ifdown-eth
-rwxr-xr-x. 1 root root  6190 4月  11 2018 ifdown-ib
-rwxr-xr-x. 1 root root   781 1月   3 2018 ifdown-ippp
-rwxr-xr-x. 1 root root  4540 1月   3 2018 ifdown-ipv6
lrwxrwxrwx. 1 root root    11 2月  25 15:05 ifdown-isdn -> ifdown-ippp
-rwxr-xr-x. 1 root root  2102 1月   3 2018 ifdown-post
-rwxr-xr-x. 1 root root  1068 1月   3 2018 ifdown-ppp
-rwxr-xr-x. 1 root root   870 1月   3 2018 ifdown-routes
-rwxr-xr-x. 1 root root  1456 1月   3 2018 ifdown-sit
-rwxr-xr-x. 1 root root  1621 3月  18 2017 ifdown-Team
-rwxr-xr-x. 1 root root  1556 3月  18 2017 ifdown-TeamPort
-rwxr-xr-x. 1 root root  1462 1月   3 2018 ifdown-tunnel
lrwxrwxrwx. 1 root root    22 2月  25 15:05 ifup -> ../../../usr/sbin/ifup
-rwxr-xr-x. 1 root root 12415 1月   3 2018 ifup-aliases
-rwxr-xr-x. 1 root root   910 1月   3 2018 ifup-bnep
-rwxr-xr-x. 1 root root 13442 1月   3 2018 ifup-eth
-rwxr-xr-x. 1 root root 10114 4月  11 2018 ifup-ib
-rwxr-xr-x. 1 root root 12075 1月   3 2018 ifup-ippp
-rwxr-xr-x. 1 root root 11893 1月   3 2018 ifup-ipv6
lrwxrwxrwx. 1 root root     9 2月  25 15:05 ifup-isdn -> ifup-ippp
-rwxr-xr-x. 1 root root   650 1月   3 2018 ifup-plip
-rwxr-xr-x. 1 root root  1064 1月   3 2018 ifup-plusb
-rwxr-xr-x. 1 root root  4981 1月   3 2018 ifup-post
-rwxr-xr-x. 1 root root  4154 1月   3 2018 ifup-ppp
-rwxr-xr-x. 1 root root  2001 1月   3 2018 ifup-routes
-rwxr-xr-x. 1 root root  3303 1月   3 2018 ifup-sit
-rwxr-xr-x. 1 root root  1755 3月  18 2017 ifup-Team
-rwxr-xr-x. 1 root root  1876 3月  18 2017 ifup-TeamPort
-rwxr-xr-x. 1 root root  2711 1月   3 2018 ifup-tunnel
-rwxr-xr-x. 1 root root  1836 1月   3 2018 ifup-wireless
-rwxr-xr-x. 1 root root  5419 1月   3 2018 init.ipv6-global
-rw-r--r--. 1 root root 19948 1月   3 2018 network-functions
-rw-r--r--. 1 root root 31027 1月   3 2018 network-functions-ipv6
[root@yuanlai-0224 network-scripts]#
3.编辑网卡的配置文件
编辑网卡配置文件
[root@yuanlai-0224 network-scripts]# ls |grep ens33
ifcfg-ens33
4.需要关闭,禁用centos7在图形化下,设置的网络服务,同时管理wifi和有线
服务名  NetworkManager

systemctl stop NetworkManager # 关闭
systemctl is-enabled NetworkManager  # 查看是否开机自启

# 禁止开机运行
systemctl disbale NetworkManager
5.启动管理网络的服务
systemctl start network

systemctl  status network # 查看网络服务状态
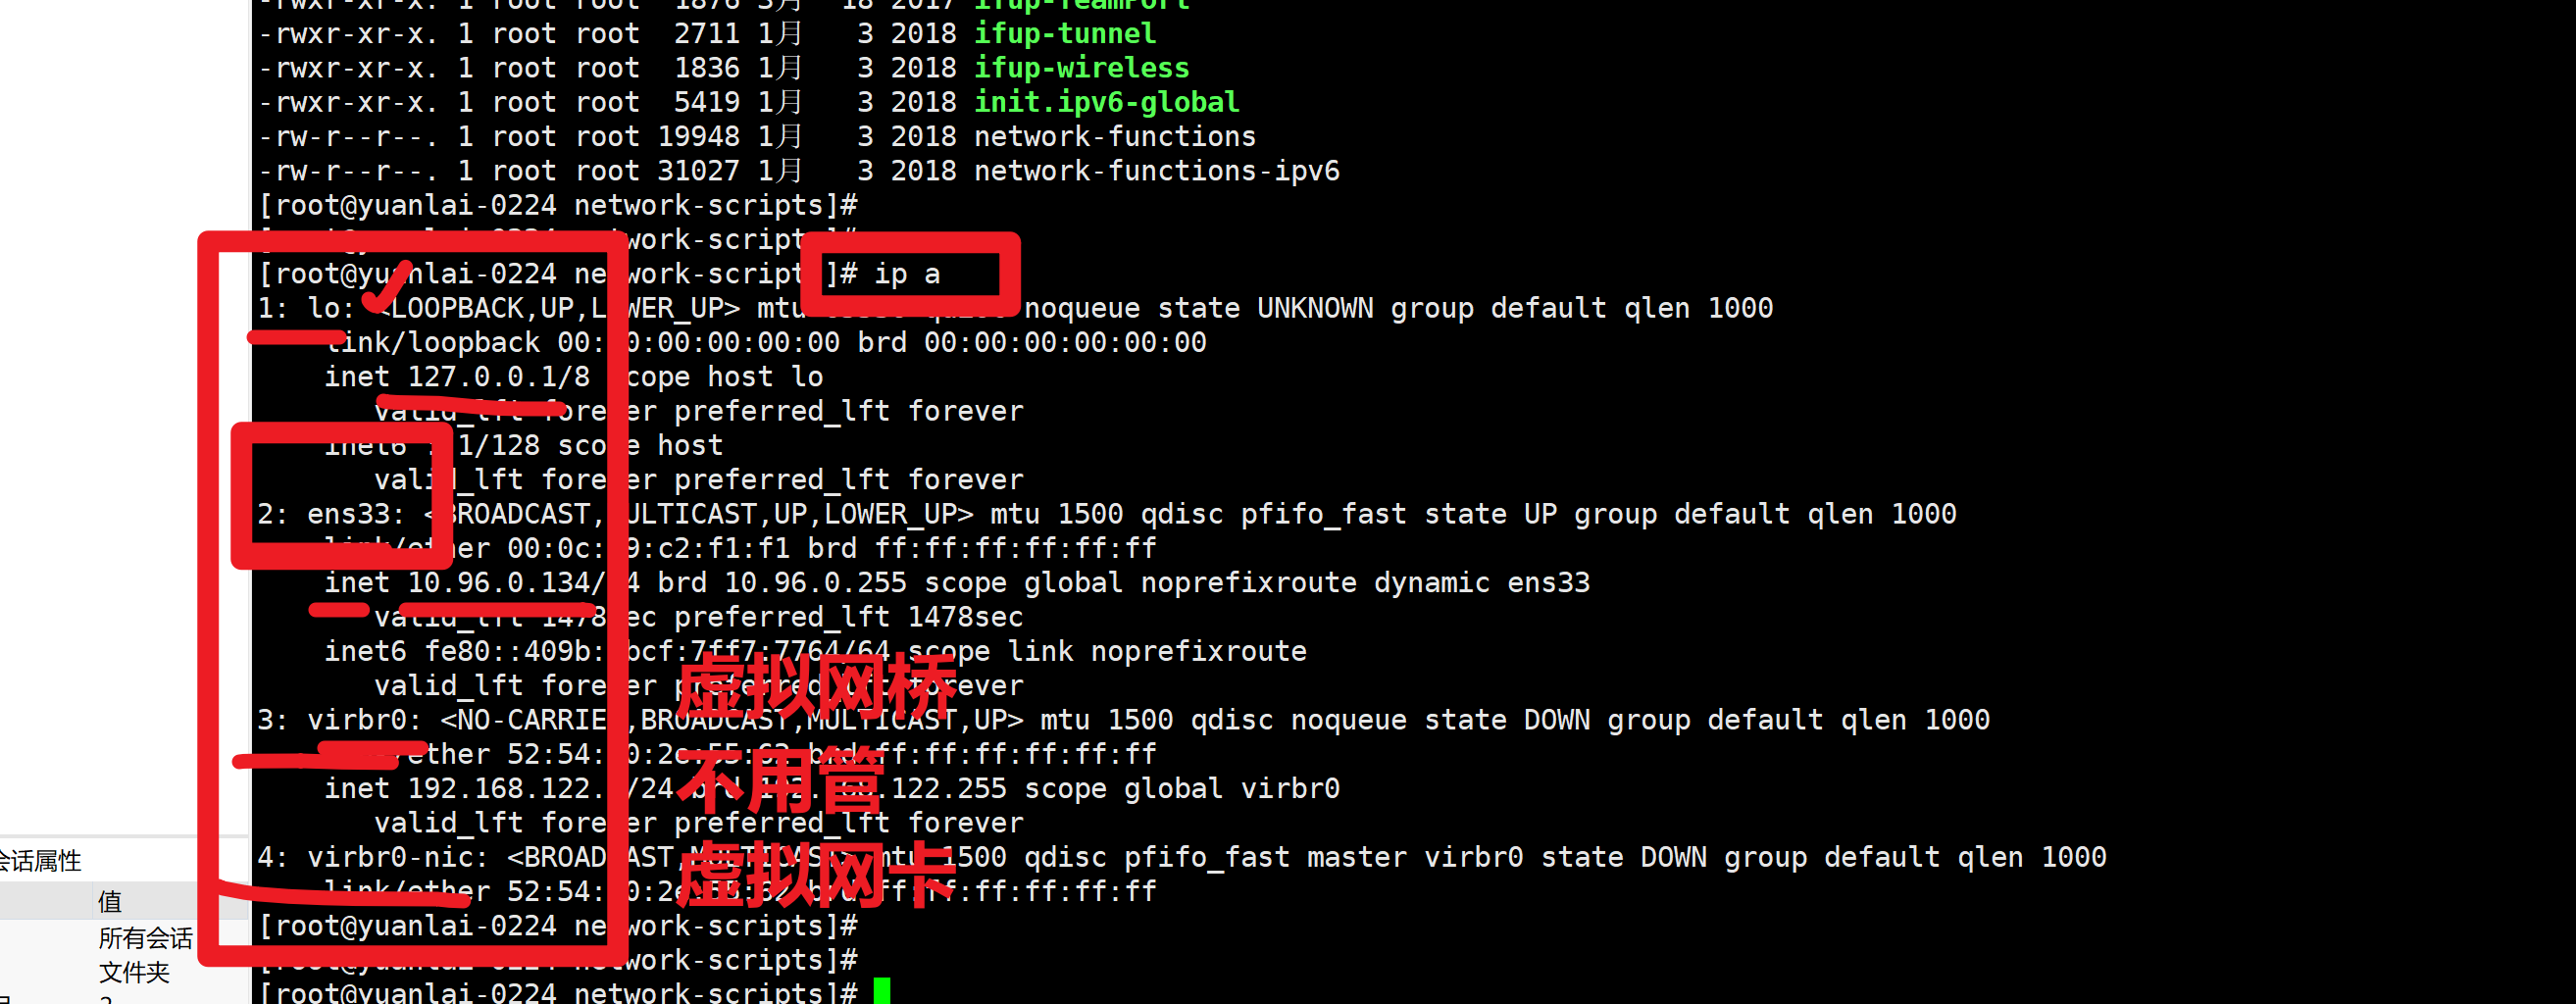
6.通过ip命令,查看ip地址信息
ifconfig
默认的dhcp动态获取ip
不用操作了,直接启动network服务即可
systemctl start netowrk
理解dhcp的路由器设置信息

改为静态ip的步骤
1.查看你的vmware虚拟网卡,网络环境是什么(NAT)
桥接
	你的linux采用桥接,等于你去这个路由器分配的局域网中,拿走一个ip,等于教室多了一个学生

NAT
	网络地址转换
	ip地址映射表
	vmnet8先找到你的虚拟网卡
虚拟机是如何上网的
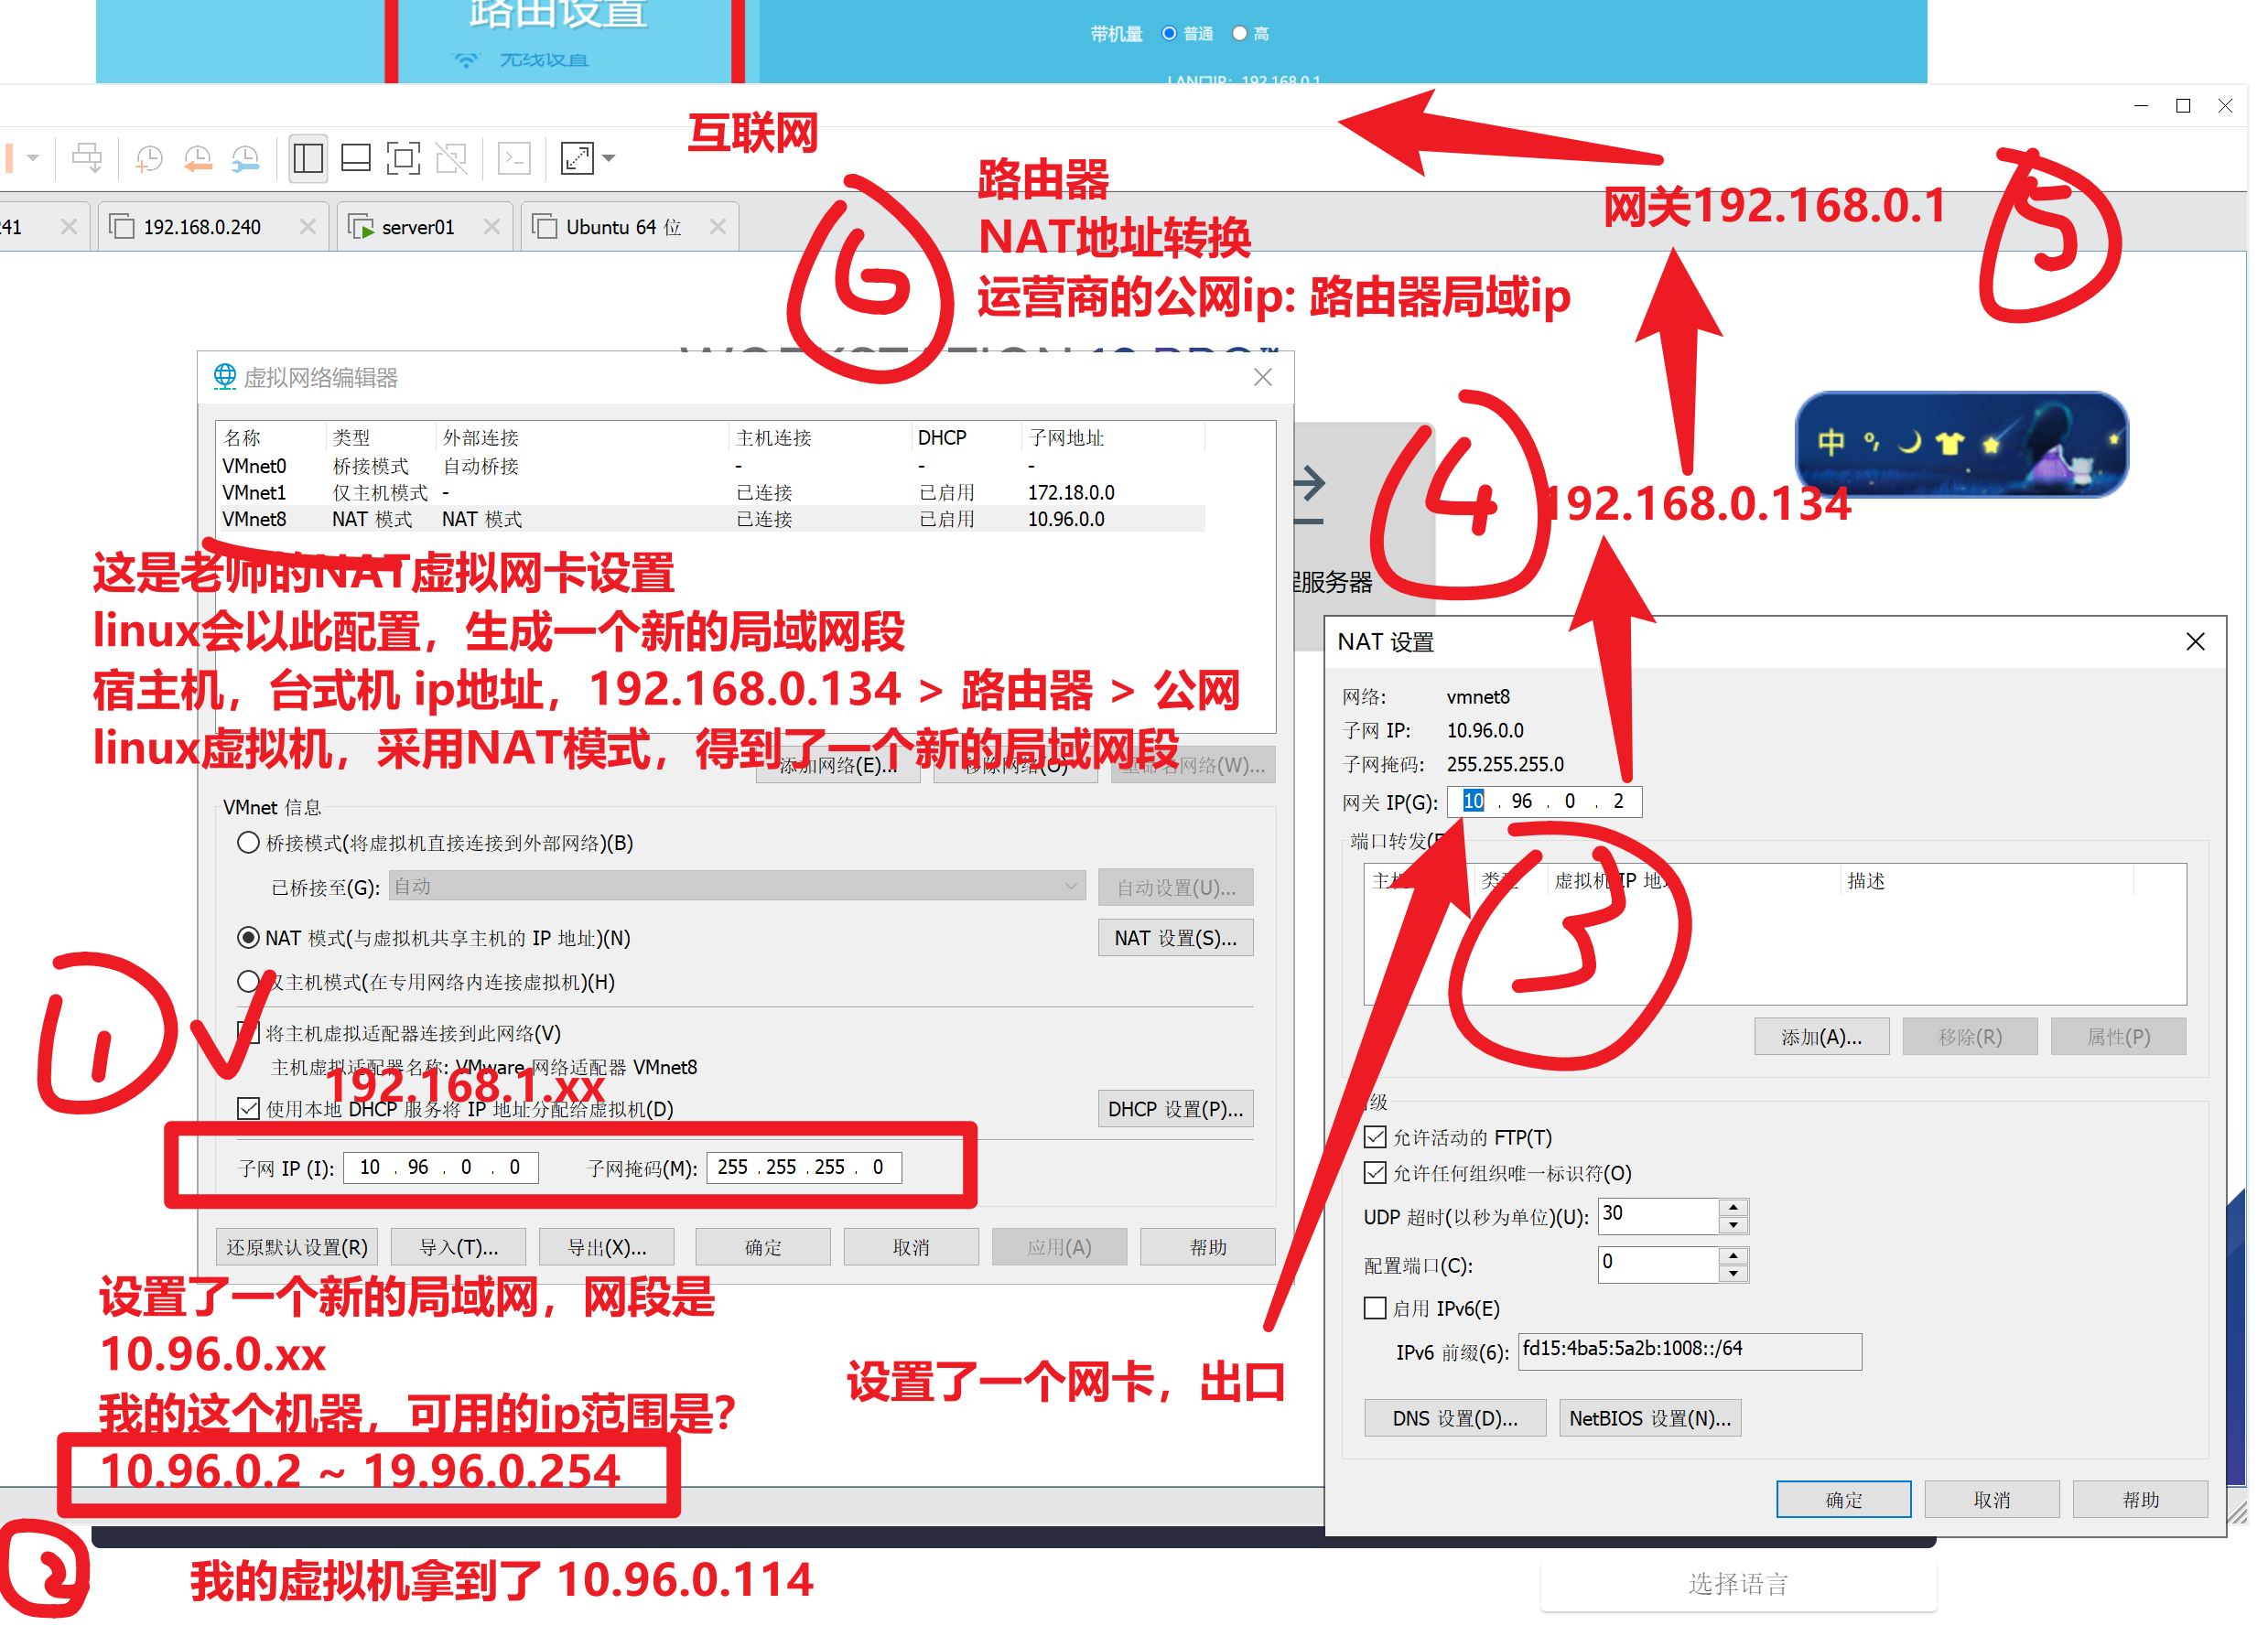
给虚拟机配置静态ip,需要根据如上配置来,找到哪些信息
- 确认你所在的网段环境 (10.96.0.xx)
- 确认网关
- 填写dns服务器地址
- 修改网卡为 static模式
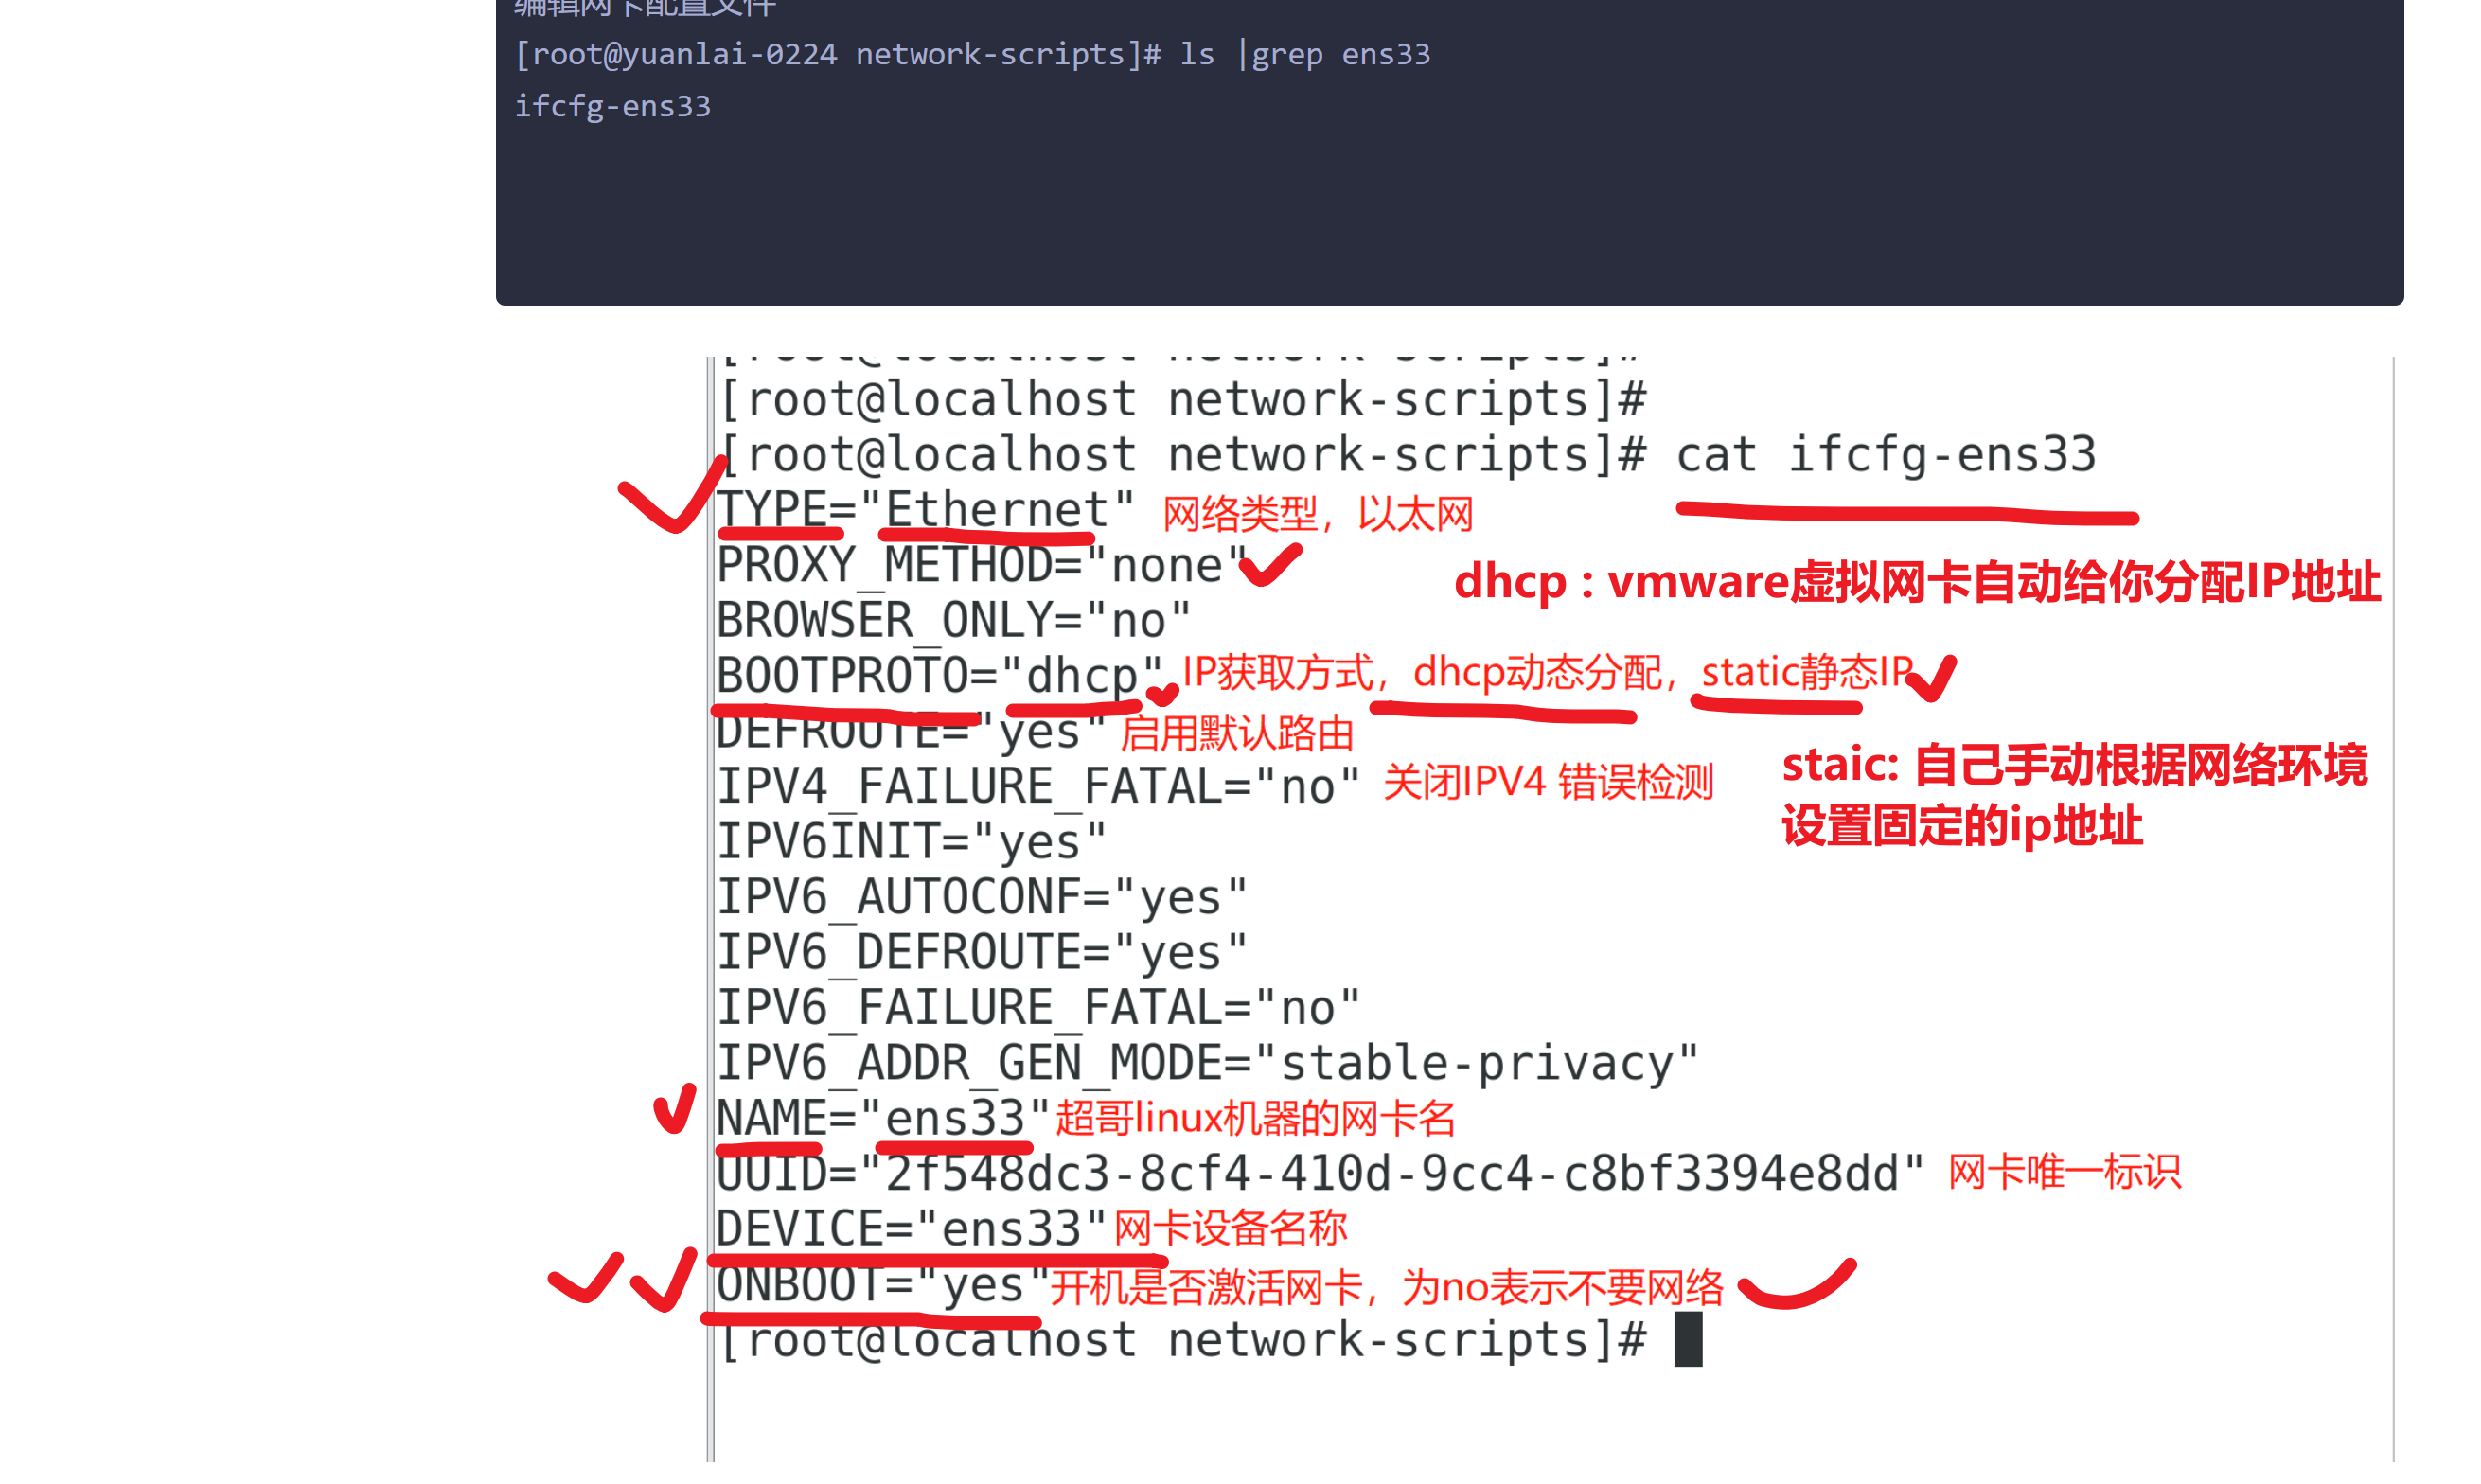
[root@yuanlai-0224 network-scripts]# cat ifcfg-ens33
TYPE="Ethernet"
PROXY_METHOD="none"
BROWSER_ONLY="no"

# 你要根据你的网络环境修改的信息如下这几个
BOOTPROTO="static"
IPADDR="10.96.0.77"
NETMASK="255.255.255.0"
GATEWAY="10.96.0.2"
DNS1='114.114.114.114'
DNS2='115.115.115.115'

DEFROUTE="yes"
IPV4_FAILURE_FATAL="no"
IPV6INIT="yes"
IPV6_AUTOCONF="yes"
IPV6_DEFROUTE="yes"
IPV6_FAILURE_FATAL="no"
IPV6_ADDR_GEN_MODE="stable-privacy"
NAME="ens33"
UUID="c00d6dd2-38dd-4f08-ba63-44333a825502"
DEVICE="ens33"
ONBOOT="yes"
5.修改配置文件,一定要重启网络服务
systemctl restart network
6.重新使用新的ip地址,试试连接
[root@yuanlai-0224 ~]#
[root@yuanlai-0224 ~]# ip addr
1: lo: <LOOPBACK,UP,LOWER_UP> mtu 65536 qdisc noqueue state UNKNOWN group default qlen 1000
    link/loopback 00:00:00:00:00:00 brd 00:00:00:00:00:00
    inet 127.0.0.1/8 scope host lo
       valid_lft forever preferred_lft forever
    inet6 ::1/128 scope host
       valid_lft forever preferred_lft forever
2: ens33: <BROADCAST,MULTICAST,UP,LOWER_UP> mtu 1500 qdisc pfifo_fast state UP group default qlen 1000
    link/ether 00:0c:29:c2:f1:f1 brd ff:ff:ff:ff:ff:ff
    inet 10.96.0.77/24 brd 10.96.0.255 scope global noprefixroute ens33
       valid_lft forever preferred_lft forever
    inet6 fe80::409b:ebcf:7ff7:7764/64 scope link noprefixroute
       valid_lft forever preferred_lft forever
3: virbr0: <NO-CARRIER,BROADCAST,MULTICAST,UP> mtu 1500 qdisc noqueue state DOWN group default qlen 1000
    link/ether 52:54:00:2e:55:62 brd ff:ff:ff:ff:ff:ff
    inet 192.168.122.1/24 brd 192.168.122.255 scope global virbr0
       valid_lft forever preferred_lft forever
4: virbr0-nic: <BROADCAST,MULTICAST> mtu 1500 qdisc pfifo_fast master virbr0 state DOWN group default qlen 1000
    link/ether 52:54:00:2e:55:62 brd ff:ff:ff:ff:ff:ff
[root@yuanlai-0224 ~]#
[root@yuanlai-0224 ~]#
[root@yuanlai-0224 ~]# ping baidu.com
PING baidu.com (220.181.38.148) 56(84) bytes of data.
64 bytes from 220.181.38.148 (220.181.38.148): icmp_seq=1 ttl=128 time=8.80 ms


64 bytes from 220.181.38.148 (220.181.38.148): icmp_seq=3 ttl=128 time=7.45 ms
64 bytes from 220.181.38.148 (220.181.38.148): icmp_seq=4 ttl=128 time=7.10 ms
最后可以访问外网,表示上述讲解的6个步骤是通常的。你的静态ip配置的也是对的
需求,你们的虚拟机,都改为NAT上网
网络环境要求和老师一样即可
10.96.0.xx网段
网关是10.96.0.2
静态ip改为 10.96.0.77
王仁刚分享
history命令
history -c # 清空历史记录命令,清空当前以登录的这个会话,所敲打的命令

所有的历史记录,想要持久化存储
被写入到文件里 ~/.bash_history


捋一捋
1.你登录了一个机器,你的操作,都会被history记录,临时存储在哎内存中
2.退出登录后,记录被写入到文件,永久存储,下一次登录  ,系统会去加载家目录中的资料,也包括 ~/.bash_hisotry


彻底清空的动作
> .bash_history


1.你登录了某机器,做了某操作,不想被记录, 直接hisotry -c ,清空你当前登录后,执行的所有操作

2. 把当前的历史记录,写入到文件中,强制写入(退出登录)
history -w # 把当前的历史记录,内存中的数据,写入到文件里


history -c
history -w

下次再登录,啥也看不到了
下午安排
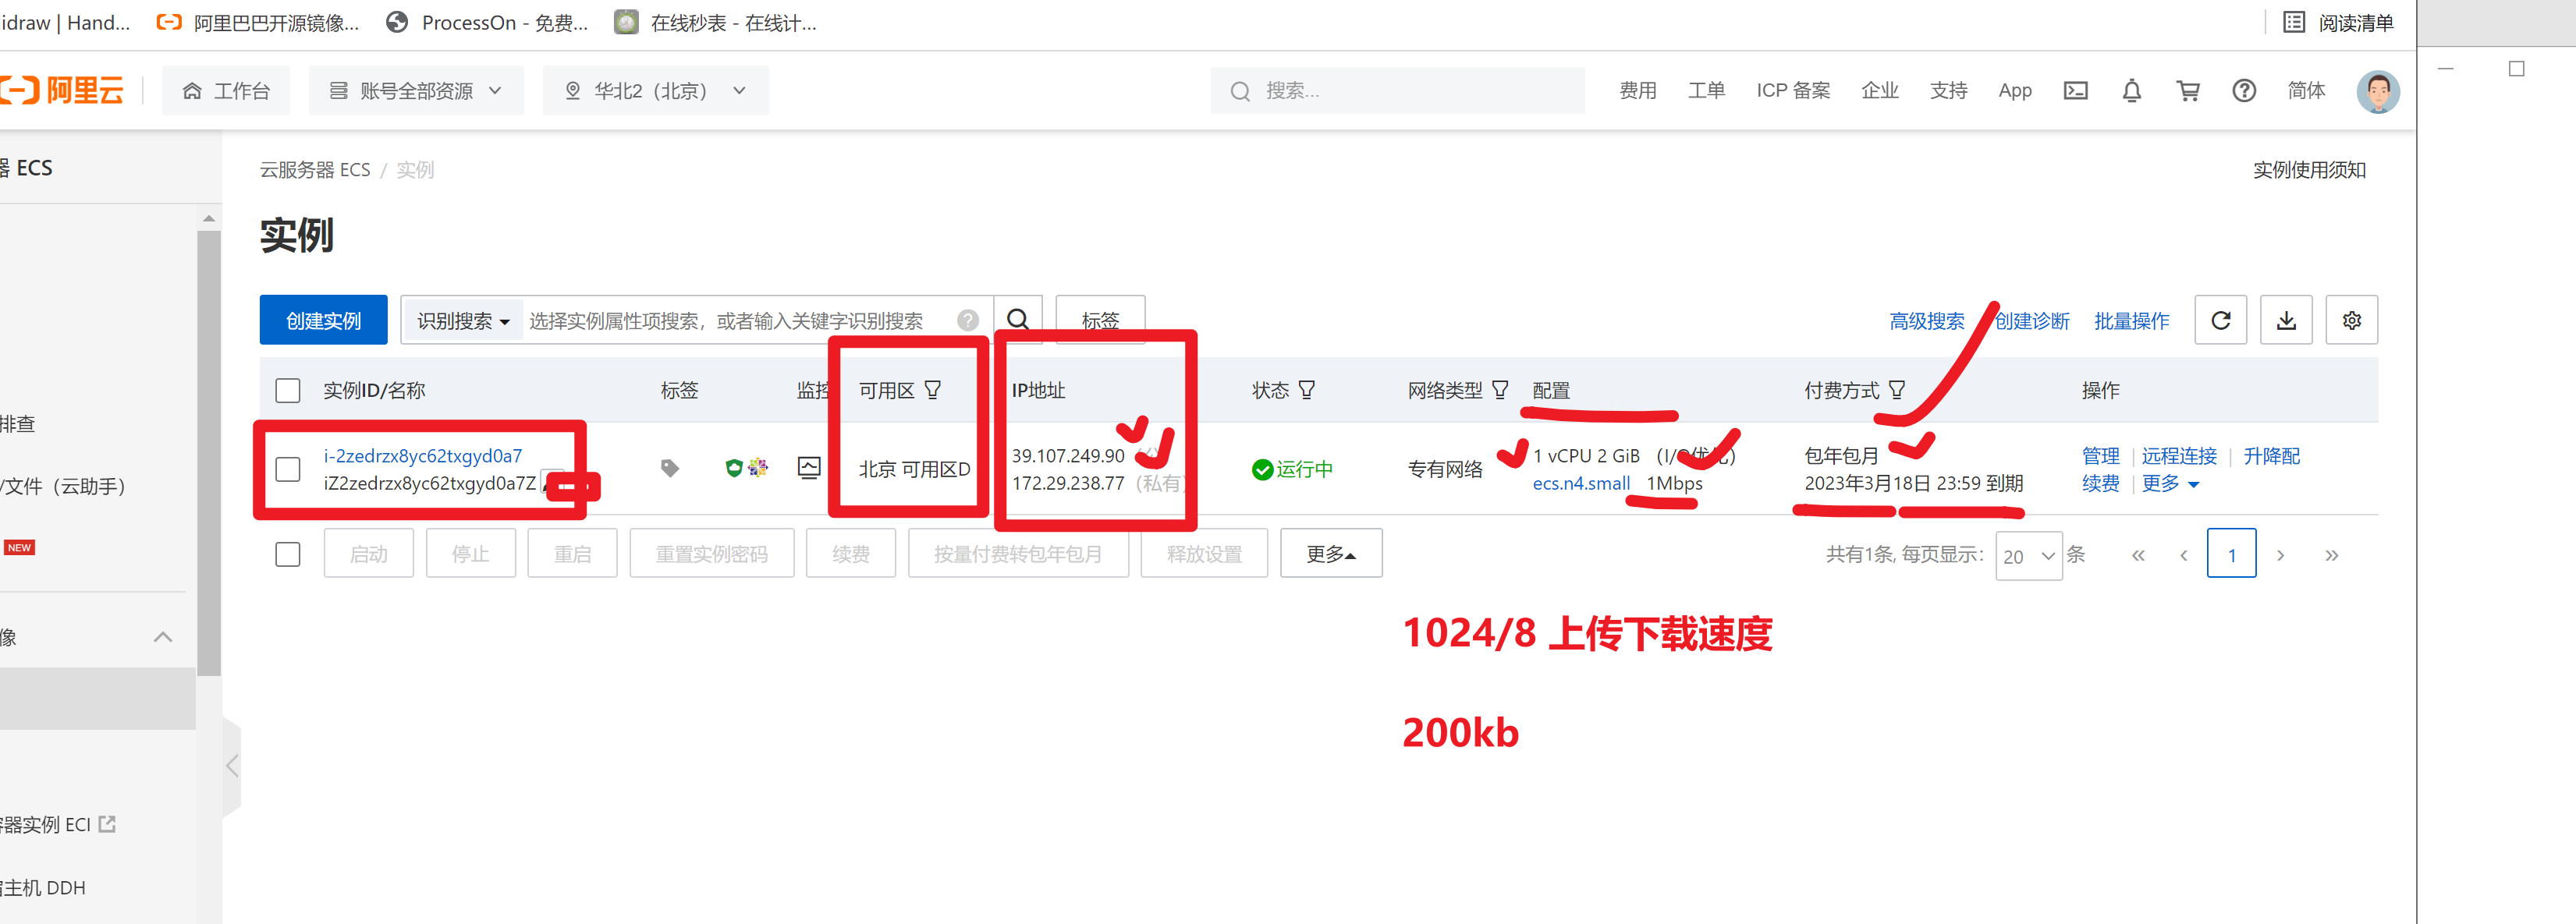
- 购买阿里云,初步接触公有云(早日接触,早点熟悉公有云的各类产品,上班后,也依然是使用这些东西)
- 多动手,反复练习linux,不仅脑力要记、肌肉记忆更重要。
- linux大量的英文单词、命令、参数、文件路径,都需要去记忆。
- 理解linux系统服务管理
新用户福利 35/一年